
How to Connect Your Domain to Cloudflare (Complete Setup Guide)
Cloudflare is a service that runs a global network of servers to enhance performance, security, and reliability for websites. It acts as a middle layer between your website and visitors, managing traffic, filtering malicious requests, and optimizing content delivery.
Connecting your domain to Cloudflare provides features like DNS management, HTTPS, caching, and performance tools to make your website efficient and secure.
Benefits of Cloudflare
Connecting your domain to Cloudflare offers several advantages for your website, including:
- Faster Websites: Content is served from locations near your site visitors.
- Enhanced Security: Protects against DDoS attacks, bots, and malicious traffic.
- Reliable DNS: Fast and stable domain resolution.
- Automatic HTTPS: There is no need to manually configure SSL certificates.
- Reduced Server Load: Caching and optimization reduce load on your hosting server.
- Performance Tools: Includes compression, minification, and mobile optimization.
- Centralized Management: DNS, SSL, caching, firewall rules, and more, letting you manage everything from a single dashboard.
What You Need Before Connecting Your Domain
Before connecting your domain to Cloudflare, ensure you have the following ready:
- Active Domain Name: You must have a registered domain.
- Domain Registrar Access: You must be logged in to your domain provider to update the nameservers.
- Website Hosting Details: Know your server’s IP address along with current DNS records.
- Email Considerations: If your domain uses email services, have your MX and TXT records available in order to avoid email disruption.
Once you have everything prepared, you can proceed to create a Cloudflare account.
Find Your Hosting and DNS Details
Before connecting your domain with Cloudflare, gather the following information from your hosting account to ensure a smooth setup:
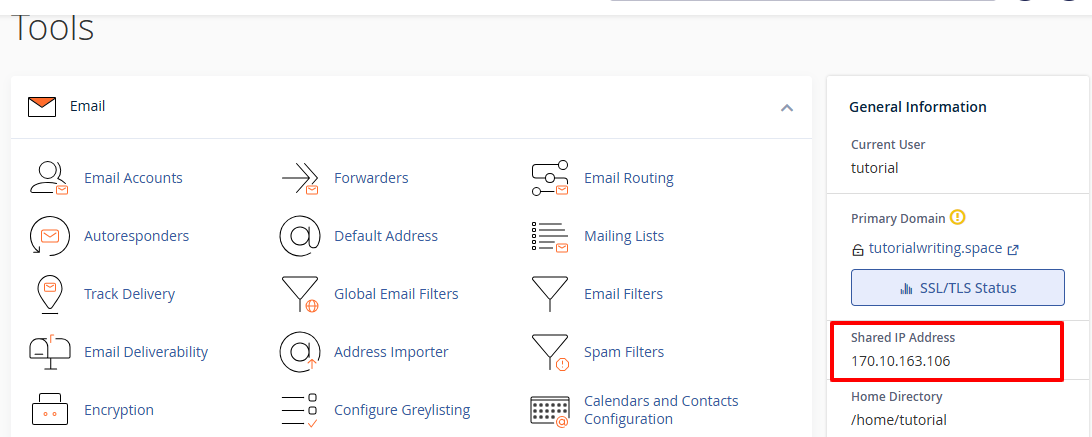
- Server IP Address: Your server IP can be found in the new account information email.

- You can also find it in your cPanel account by following these steps:
- Log in to your cPanel account.
- In the right-hand panel, locate the section labeled General Information and find the entry for Shared IP Address.

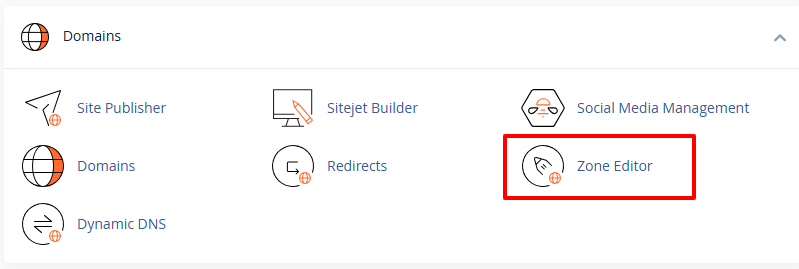
- DNS Records (A, CNAME, TXT): To locate your DNS records:
- In your cPanel account, go to the Domains section and then click on Zone Editor.

- You will be presented with a list of your domains. Click the Manage button next to the domain whose DNS records you want to view.

- Here you will see all your DNS records.

- Email Records (MX & TXT):
- MX records: MX records are available in your new account information email.

- SPF, DKIM and DMARC Records: To find these records:
- Log in to your cPanel account.
- Navigate to the Email section and click on Email Deliverability.

- You will be presented with a list of your email accounts.
- Click the Manage button next to the email account that is associated with your domain.

- Here, you can view and manage the SPF, DKIM, and DMARC records of that email account.


- MX records: MX records are available in your new account information email.
- In your cPanel account, go to the Domains section and then click on Zone Editor.
- DNS Records (A, CNAME, TXT): To locate your DNS records:



Gathering these details ensures your website and email services will continue working properly after your domain is connected to Cloudflare.
Access Your Cloudflare Account
To connect your domain, the next step is to access your Cloudflare account. If you already have an account, log in to the dashboard on their website using your credentials. Once you’ve logged in, you can add your domain and manage all your DNS settings directly from the panel.
If you don’t already have a Cloudflare account, creating one is straightforward. The sign-up process is quick and requires only basic information, such as your email address and a password. Once you’ve set up your account, you’ll be directed to your dashboard, where you can begin adding your domain and configuring your DNS records.
Add Your Domain to Cloudflare
- Click the + Add button from your Cloudflare dashboard.
- Click on Connect a Domain.

- In the Enter an existing domain field, type your domain name, without www or https://.

- Choose how to handle the DNS records. You will be presented with three options:
- DNS Quick Scan: Cloudflare will automatically scan for common DNS records and import them into the Cloudflare system.
- Manually input DNS records: Manually enter all the DNS records.
- Upload a DNS zone file: Upload a pre-prepared DNS zone file from your hosting account.

- Control how AI crawlers access your site: Cloudflare lets you manage how AI bots access your site.
- Block AI training bots on all pages: Prevents scraping of all site content.
- Block only on hostnames with ads: Blocks AI bots on subdomains which contain ads but allows them elsewhere.
- Do not block (allow crawlers): AI bots are allowed to scrape content.

- Instruct AI bot traffic with robots.txt: Use robots.txt to provide more granular instructions for AI crawlers.

- Click Continue after you’ve reviewed your DNS and AI Crawler settings to proceed with the next step of connecting your domain

- Choose which Cloudflare plan you need: Free, Pro, Business, or Enterprise. Then click on the Select a Plan button in that plan’s section.

- Scroll down to Replace your current nameservers with Cloudflare nameservers, and copy the nameservers listed there.


Update Your Domain Nameservers to Cloudflare
- Log in to your account at your domain registrar and navigate to the section where your domain settings or DNS management is available.
- The nameserver settings may be located under DNS Management, Domain Settings, or Nameservers.
- Replace your existing nameservers with the Cloudflare nameservers you copied from your dashboard.
- Save or apply changes at your registrar.
Wait for Cloudflare Activation
Please note that after updating your nameservers at your domain registrar, it will take some time for the changes to propagate across the internet. DNS propagation can take anywhere from a few minutes up to 24–48 hours.
Once propagation is complete, Cloudflare detects the updated nameservers and then marks your domain as active within your dashboard. At this stage, your website traffic will begin routing through Cloudflare, and all performance and security features will be applied.
Manage DNS Records in Cloudflare
Access the DNS Records:
- Select your domain on the Cloudflare dashboard.

- Click on DNS in the left sidebar, then click on Records to view and manage your DNS settings.

- Double-check that all DNS records imported from your hosting account are correct: A, CNAME, MX, and TXT.


Add or Edit DNS Records
- Click Add Record to create a new DNS record.
- Using the Type drop-down menu, select the record type – A, CNAME, MX, TXT, etc., and fill in the information for it.

- Click the Edit button beside the record to edit existing records.


Enable or Disable Proxy (Proxied / DNS Only):
- You can choose the following for A and CNAME records:
- Proxied: Traffic goes through Cloudflare for caching, DDoS protection, SSL, and performance optimization

- DNS Only: Traffic goes directly to your server without Cloudflare features.

- Proxied: Traffic goes through Cloudflare for caching, DDoS protection, SSL, and performance optimization
- MX, TXT, and other record types are always DNS Only.


Delete Unnecessary Records:
Remove old or unused records to avoid conflicts.
To delete a record:
- Find the record that needs to be removed in the DNS records list.
- Click the Edit button next to the record that you want to remove

- Then click Delete and confirm the deletion when prompted.


Configure SSL/TLS Settings
SSL ensures that all the data transferred from or to your website with visitors will be encrypted; this involves sensitive information including login credentials, payment details, and personal data. It also enhances SEO rankings and builds trust among users.
To enable SSL:
- Navigate to the SSL/TLS section in the Cloudflare dashboard. Click on Overview.

- Choose the mode of encryption for SSL/TLS: Off, Flexible, Full, Full (Strict).

- Cloudflare will automatically issue an SSL certificate for your domain.
- After having enabled SSL, verify whether your website loads properly with HTTPS.


Test Your Website
Once you have your domain connected to Cloudflare, and SSL/TLS enabled, you should check whether your website is working correctly:
- Access your website using https://yourdomain.com and verify the site opens without any errors.
- Ensure the browser displays a secure padlock icon indicating SSL/TLS.
- Send and receive emails, in case your domain uses email services, to ensure MX records are set correctly.
- Check that your site loads quickly and securely from different devices and locations.
- If any issues are found, review and update your DNS records inside Cloudflare to correct them.
Connecting your domain to Cloudflare is a smart way to secure your website, improve load times, and simplify DNS management. In turn, after the setup, it will grant your site enhanced protection, smoother performance, and peace of mind for you and a better experience for your visitors.
Moreover, Cloudflare runs continuous monitoring and automatic updates to make sure that your website remains resistant to all kinds of hazards, including DDoS attacks and malicious traffic. You take advantage of DNS management and SSL/TLS, reducing server load and increasing reliability so your site can handle more visitors without having any adverse impact on performance or security.