
How to Point Domain Nameservers to MaxCyberHost
The nameservers are an important part of how a domain communicates with the internet. They act like a phonebook directory for DNS, telling browsers, email services, and other Internet systems where to look for a domain’s server to access the content and settings of that domain. When anyone visits a website, sends an email, or uses a service under a particular domain, nameservers provide the routing information necessary for that request to be directed to the right destination.
The DNS information is stored on and delivered by nameservers, which ensure that a domain’s website files, routing emails, security configurations, and other records are accessible and resolved at all times. With the absence of appropriately configured nameservers, a domain would be unable to communicate with the hosting server, thus not being able to load websites and services correctly.
By pointing your domain’s nameservers to MaxCyberHost, you will route all traffic, emails, and DNS requests to the servers at MaxCyberHost. This will allow your website and associated services to operate correctly.
What You Need Before Updating Nameservers
Before making changes, ensure that you have:
- An active MaxCyberHost hosting account: You should have set up a hosting plan and have it ready to receive the traffic to your domain.
- Access to your domain registrar account: the place where your domain is registered.
- MaxCyberHost nameserver details: These are usually given in your hosting welcome email. Default MaxCyberHost nameservers are:
- ns1.maxcyberhost.com
- ns2.maxcyberhost.com
- ns3.maxcyberhost.com
- ns4.maxcyberhost.com
Point Your Domain to MaxCyberHost
Follow these steps to update your domain’s nameservers and connect it to MaxCyberHost:
Step 1: Log in to your Domain Account
- Open your domain registrar’s website.
- Log in by providing account credentials.
Step 2: Choose Your Domain
- Go to your Domains or My Domains section.
- Click on the domain you want to connect to MaxCyberHost.
Step 3: Find the Nameserver settings
- Look for options like Nameservers, Custom DNS, or DNS Management.
- Change from default nameservers to Custom Nameservers.
Step 4: Set MaxCyberHost Nameservers
- Input the following MaxCyberHost nameservers:
- ns1.maxcyberhost.com
- ns2.maxcyberhost.com
- ns3.maxcyberhost.com
- ns4.maxcyberhost.com
- If your registrar only has two fields, enter the first two nameservers:
- ns1.maxcyberhost.com
- ns2.maxcyberhost.com
- If your registrar shows four fields, enter all four nameservers as above.
Step 5: Save Changes
- Save the changes to confirm the new nameservers.
- Some registrars also send out a confirmation e-mail; approve it if necessary.
Step 6: Allow Time for DNS Propagation
- Nameserver changes can take time to propagate on the internet.
- The propagation is typically 1–4 hours, though it may take as long as 24–48 hours.
- Temporary downtime for the website or email is normal during this period.
Step 6: Allow Time for DNS Propagation
Once you have pointed your domain to MaxCyberHost, you will need to add it to your hosting account so that your website files and services are properly connected:
- Log in to your cPanel account.
- Go to the Domains section and click on Domains.

- Click on Create a New Domain.

- Enter your domain name in the Domain field.

- Uncheck the Share Document Root (/home/…) option if you want to keep website files separate from your main domain.

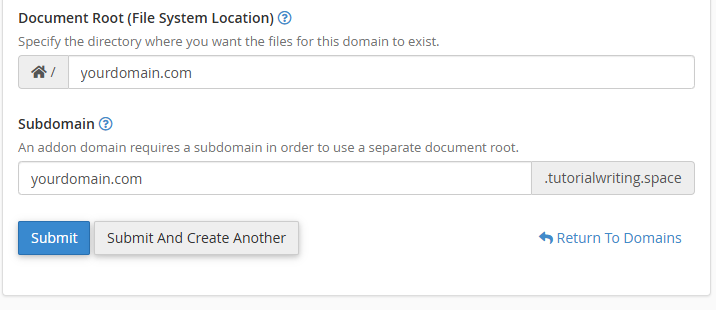
- cPanel will automatically populate the Document Root and Subdomain fields – just leave them as they are.

- Click Submit to complete the process.



Now that your domain is correctly pointed to MaxCyberHost and added to your hosting account, all is set for your website and related services to be fully connected and operational. When the nameservers are set up and configured correctly, with the domain added in cPanel, the traffic, emails, and DNS requests will effectively flow through MaxCyberHost’s servers.
You can confidently manage your website files, set up email accounts, and use all the features of your hosting plan. Keeping your domain and hosting correctly connected ensures a stable, reliable, and secure online presence.