
How to connect your domain to your hosting
Connecting your domain to your hosting account is a crucial step in getting your website up and running. This guide provides clear, step-by-step instructions to ensure that your domain is properly connected to your MaxCyberHost hosting account. Let’s get started on making your online presence a reality!
Step 1: Get Your MaxCyberHost Nameservers
Once your hosting account is set up, you will receive an email from MaxCyberHost containing your account details. This email includes the nameserver details. Keep this email handy, as you will need these nameservers to connect your domain to your hosting account.
Step 2: Update Your Domain’s Nameservers
- Log in to your domain registrar’s account where you bought your domain.
- Navigate to the domain management section.
- Look for options such as DNS Settings or Nameserver Settings (it may also be called Manage Domain, Domain Settings, or Domain Management depending on your registrar).
- Replace the existing nameservers with the nameservers provided in your MaxCyberHost email.
- Make sure to save your changes.
- Step 3: Wait for DNS Propagation
After updating your nameservers, it may take anywhere from a few minutes to 24 hours for changes to propagate across the internet. During this time, your website might be temporarily inaccessible, or visitors might see a previous version of your site.
Step 4: Add Your Domain as an Addon Domain
After your domain’s DNS has fully propagated and is pointing to your hosting account, you can add it as an Addon Domain in cPanel to host a separate website. Here’s how to do it:
- Log in to your cPanel Account.
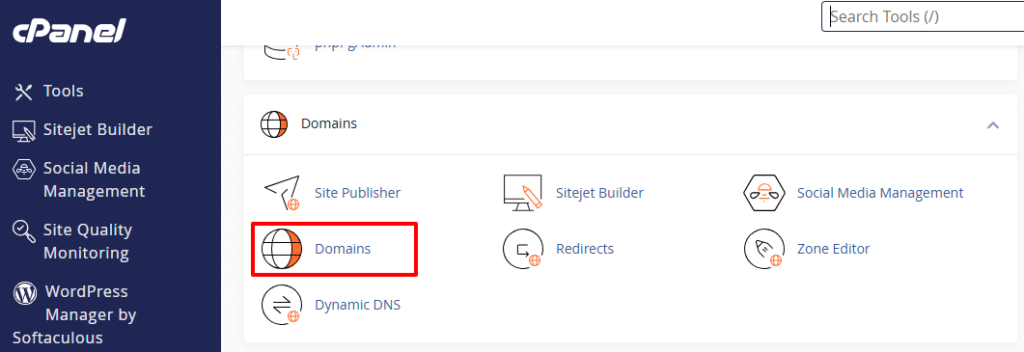
- Scroll down and click on Domains under the Domains section.

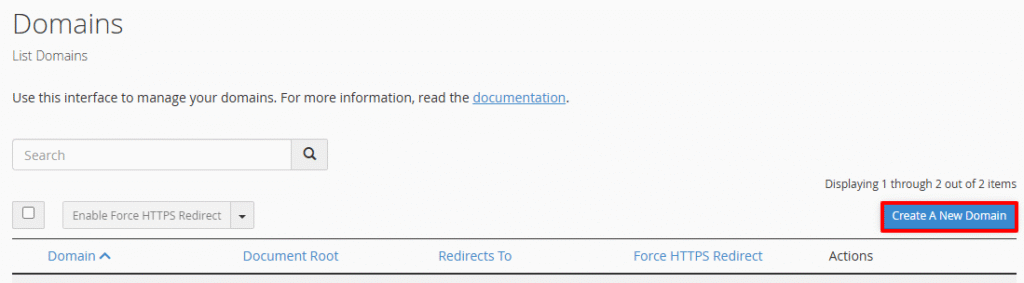
- Click on Create A New Domain.

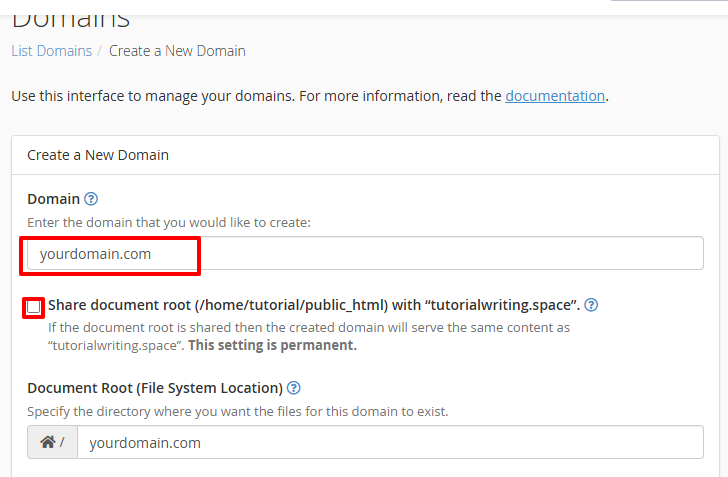
- Enter your domain name in the provided field. By default, the Document Root checkbox is selected; you can leave it checked or deselect it if you want a separate folder.
Note: It is advisable to have this option unchecked to keep the website files for this domain separate from your other websites.
- Click the Submit button to finish the setup.

- Your new addon domain will now be listed alongside your other domains in cPanel and is ready to host its own website.

Step 5: Verify the Connection
After DNS propagation is complete and your domain has been added, open your web browser and enter your domain name. If your website loads successfully, it means your domain is correctly connected to your MaxCyberHost hosting account.
You can now upload website files through cPanel. Additionally, you can create email accounts for your domain using cPanel to manage your communications more effectively. Now you’re all set to take the next steps in developing your website and enhancing your online brand!
One Comment
Comments are closed.