How to Connect Your Website to FileZilla: FTP/SFTP Setup Guide
The effective management of your website files is a very crucial step in keeping a smooth and safe online presence. You can use FileZilla as your go-to FTP or SFTP client to connect to your website’s server for uploading new content, updating themes, or troubleshooting issues in general. This tutorial shows how you can connect your website with FileZilla and manage files smoothly in a step-by-step manner.
What is FileZilla and Why Use It?
FileZilla is a powerful, free, and open-source FTP client that enables you to transfer files from your local computer to your website server and vice versa. Employing FileZilla will guarantee:
- Cross-platform: Works on Windows, macOS, and Linux.
- Fast file transfers: Quickly upload and download files with ease.
- Secure Connections: SFTP provides encrypted file transfers for your data.
- Easy file management: Organize, move, rename, or delete files directly on your server.
Understanding FTP and SFTP
When connecting to your server, you can use either FTP or SFTP:
- File Transfer Protocol (FTP): This is a standard way of transferring files. Although simple, it is less secure.
- SFTP (Secure File Transfer Protocol): Uses SSH encryption to ensure secure transfers. It is highly recommended when handling sensitive data.
What You’ll Need Before Connecting
To connect your website through FileZilla using FTP, you will require the following details, which can be found in your cPanel dashboard. To access them:
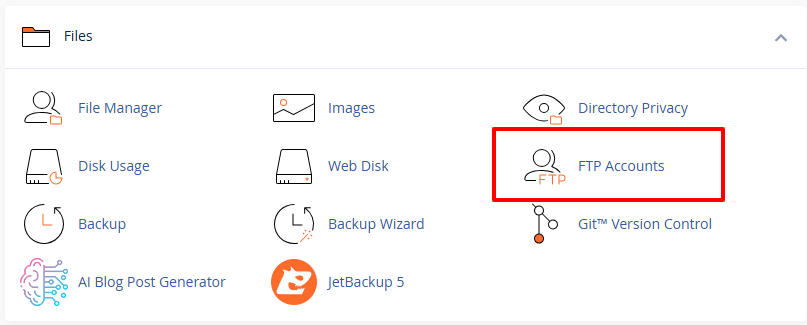
- Log into your cPanel account.
- Navigate to the Files section, then click FTP Accounts.

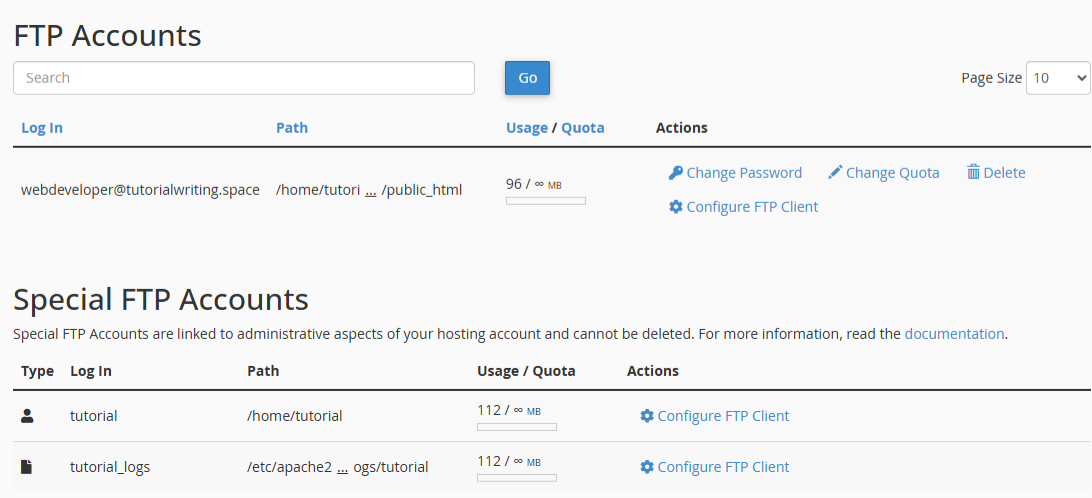
- You will see a list of all FTP accounts and an option to add new accounts.
To add a new FTP account, refer to this tutorial: How to Create and Manage FTP Accounts in cPanel.
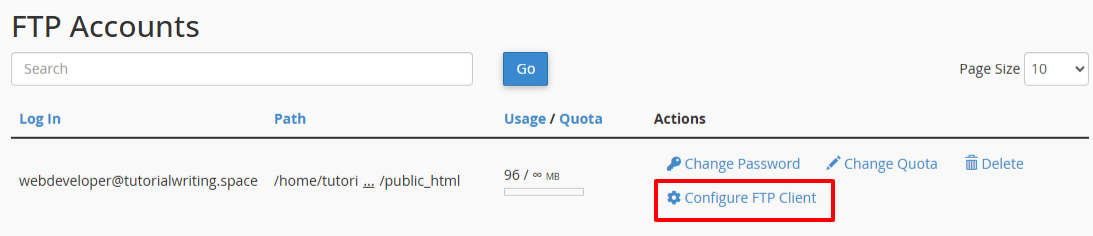
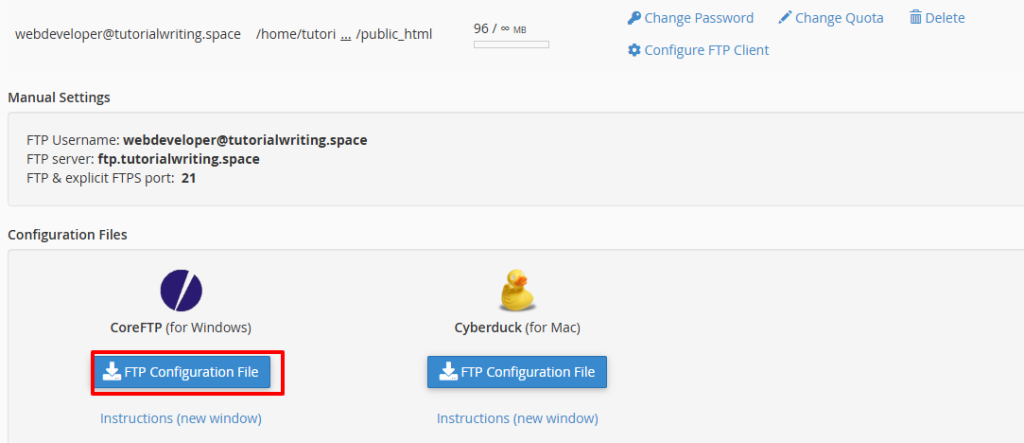
- To check the FTP account details, click Configure FTP Client next to the FTP account to which you want to connect.

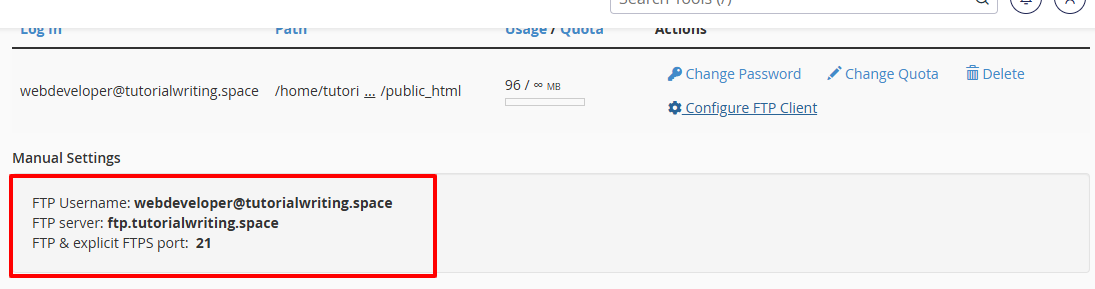
- Inside the manual settings, you will find the FTP account details:
- FTP Username: This is a unique identifier for your FTP account through which you log in to access your website files. Example: [email protected]
- FTP Server: The address of your web server where the files of your website are stored. Example: ftp.tutorialwriting.space
- FTP & Explicit FTPS Port: This is the port number on which the FTP connection is established. Example: 21

- FTP Password: This is the password used by your FTP account to authenticate your login.
Note: You can also download the FTP configuration file to automatically set up your FTP client without manually having to enter these details.
FTP Configuration File
The FTP configuration file allows you to configure your FTP client automatically without manually having to enter FTP details.
- It contains all necessary information: FTP server, username, port, and the connection type.
- By importing this file in FileZilla, your account will be instantly set up, saving you time and avoiding errors.
- This ensures a quick and accurate connection to your server.
Download and Install FileZilla
- Go to the FileZilla official website.
- Download FileZilla Client (not the server).
- Run the installer and follow the onscreen instructions
- Once installed, launch FileZilla.
Connect Using Quickconnect
FileZilla’s Quickconnect allows for quick connections without necessarily having to save the site in Site Manager:
- Open FileZilla.
- In the Quickconnect bar at the top, type:
- Host: ftp.tutorialwriting.space (replace with your domain’s FTP server or your server’s IP address)
- Username: [email protected] (replace with your FTP username)
- Password: Your FTP password
- Port: 21
- Click Quickconnect.

- Once you are connected, your local files appear on the left panel and the server files appear on the right panel.
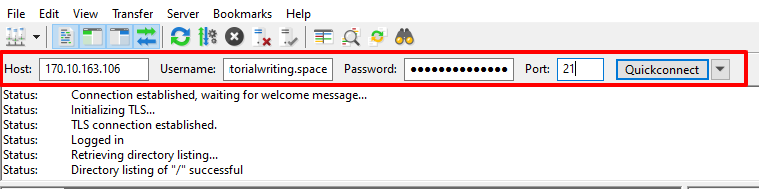
Quickconnect tips:
- Ideal for temporary or fast connections.
- For repeat use, save your site in Site Manager for secure access.
- If the connection fails, double-check your credentials and server information.
Connect Using Site Manager (FTP)
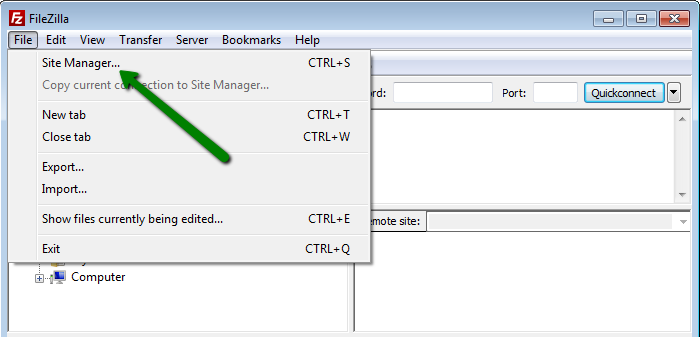
- Click on the File tab, then select Site Manager from the menu, or simply press Ctrl + S.

- Click New Site and give a name to your connection, for example, My Website FTP.
- Choose the protocol: FTP – File Transfer Protocol
- Enter the following information:
- Host: ftp.tutorialwriting.space (replace with your domain’s FTP server or your server’s IP address)
- Port: 21 – default for FTP
- Encryption: Select Use explicit FTP over TLS to encrypt your file transfers and credentials
- Logon Type: Select one of the following:
- Normal: Stores your username and password for easier future connections
- Ask for password: This asks you to input your password each time for greater security
- Username: [email protected] (replace with your own FTP username)
- Password: Your FTP account password (if using Normal)
- Click Connect.

- If prompted to trust the server certificate, click OK.
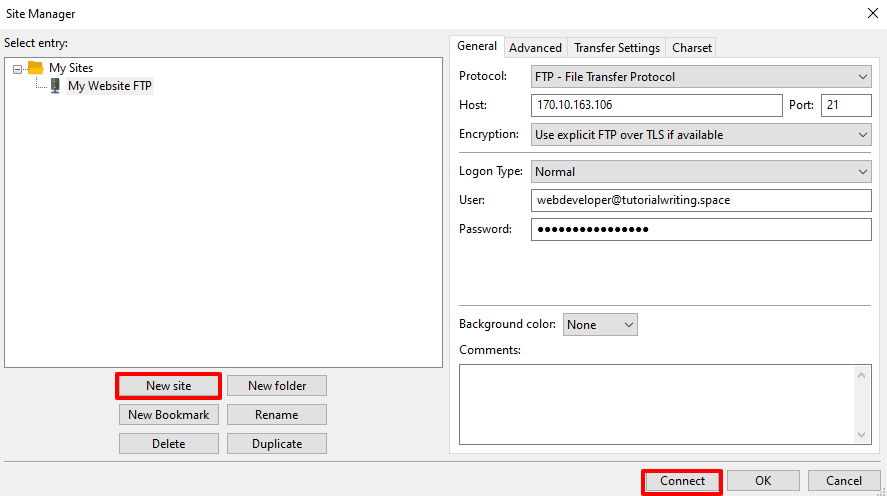
Tip: Use Normal for convenience if you trust your computer, and Ask for password for extra security.
SFTP Connection (Optional Secure Connection)
SFTP stands for SSH File Transfer Protocol, a secure means of transferring files between your computer and your web server. Your login credentials are encrypted, as well as your data, to safeguard sensitive information during transfers.
Set Up an SSH Key
Before connecting via SFTP, you may need to configure an SSH key on your hosting account:
- Log in to your cPanel account.
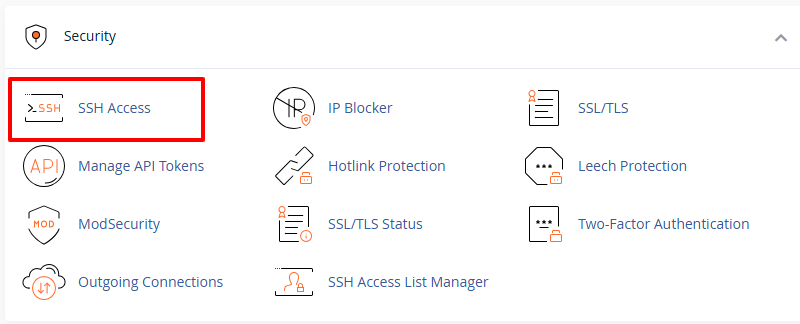
- Scroll down to the Security section, and click on SSH Access.

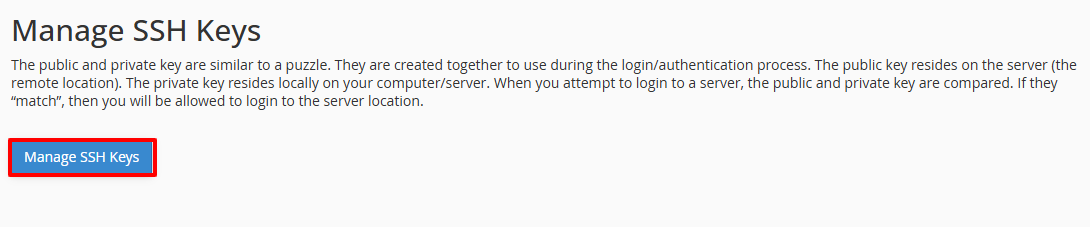
- Click Manage SSH Keys.

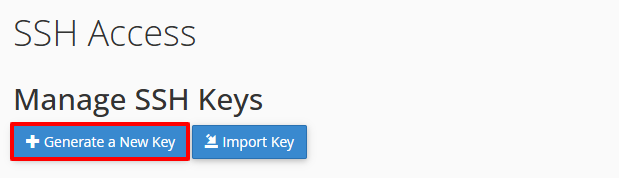
- Generate a new key pair or import an existing SSH key.
- To create a new key pair:
- Click Generate a New Key Pair.

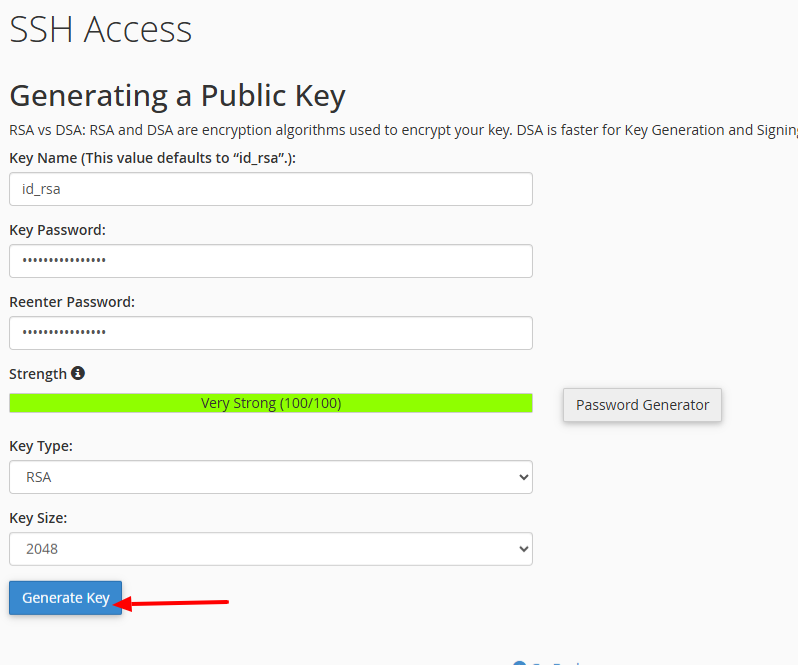
- Enter a password for your key, so as to secure it.
- Select Key Type:
- RSA: A widely used and secure encryption algorithm, suitable for most modern servers.
- DSA: An older encryption algorithm; less commonly used but still supported on some servers.
- Select Key Size:
- 1024 bits: Basic security, not recommended for modern use.
- 2048 bits: Standard and secure for most purposes.
- 4096 bits: High security; recommended for sensitive data or long-term use.
- Click Generate Key to create your public and private keys

- Click Generate a New Key Pair.
- Once the key is generated, authorize it so SFTP can use it to connect:
- Go back to the SSH Keys.
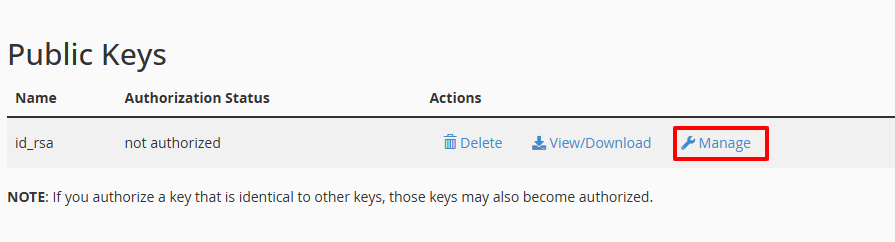
- Scroll down to the Public Keys section.

- Locate the key you created and click Manage.
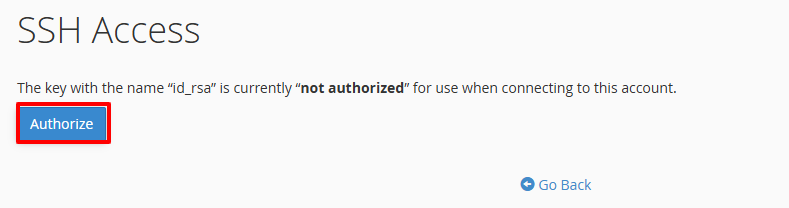
- Click Authorize to enable the key for SFTP access.

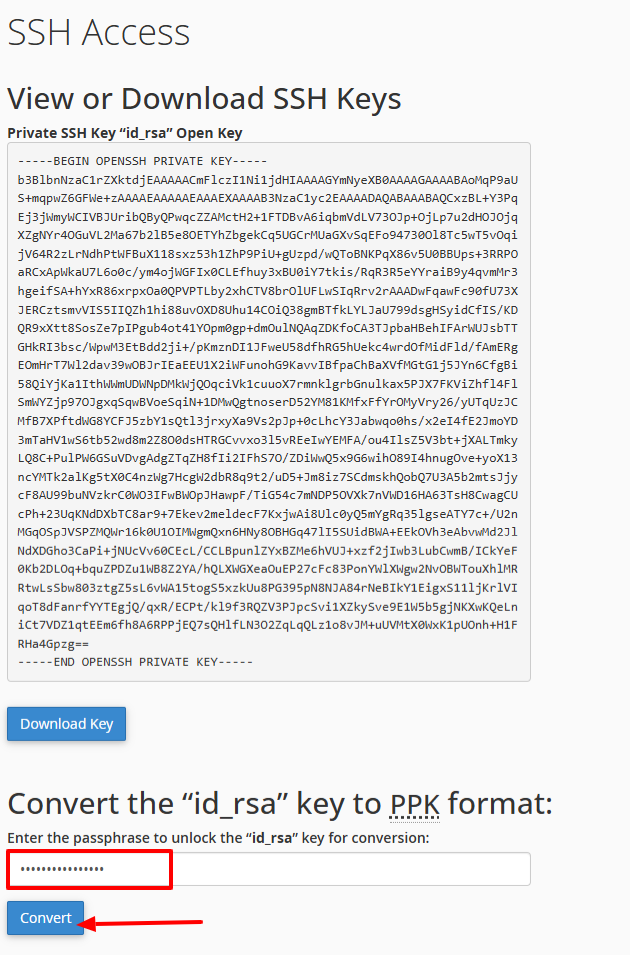
- Download the Private Key for FileZilla:
- In the Private Keys section, click View/Download next to the private key you generated.
- Click Convert to create a usable key format (like PPK, which is required for FileZilla and PuTTY-based applications).
- When converting the key, you only need to supply the passphrase you created when you made the key.
- The passphrase is the password you set when you created the SSH key, which is used to unlock and transform the key securely.

- After the conversion, click Download Key and then save the converted key file to a safe place on your computer.
Hint: Keep your private key and passphrase safe at all times: they grant direct access to your cPanel account.
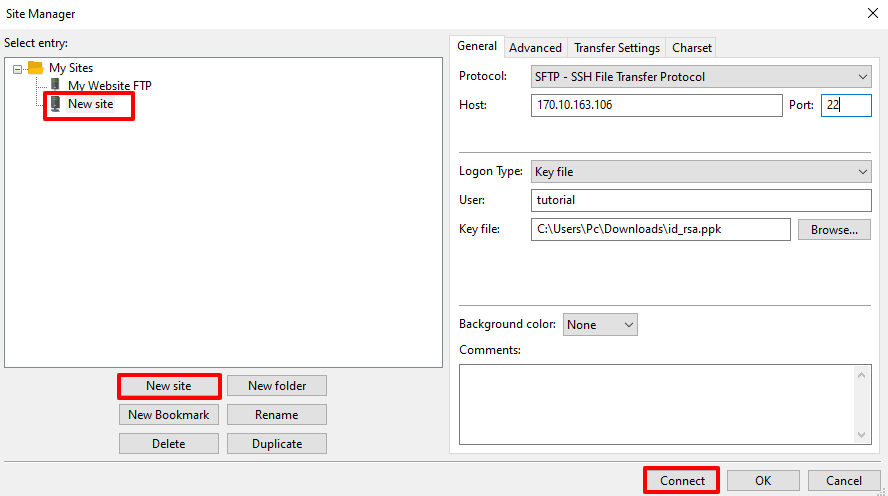
Connect Using Site Manager (SFTP)
After you have set up and authorized your SSH key, follow the steps below to connect through FileZilla.
- Open FileZilla.
- Click File > Site Manager, or press Ctrl + S.
- Click New Site and give it a name such as: My Website SFTP.
- On the right side, fill in the following information:
- Protocol: SFTP – SSH File Transfer Protocol
- Host: Your server’s IP address
- Port: 22
- Logon Type: Key file
- User: Your cPanel username
- Key File: Click Browse and select the converted private key file (PPK) that you downloaded from cPanel.
- Click Connect.

- The first time you connect, FileZilla may ask you to trust the server’s host key.
- Click OK to continue.
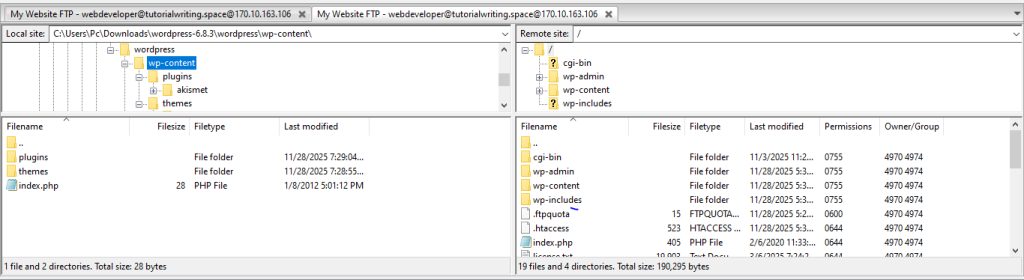
Working with Local and Remote Directories in FileZilla
Once connected to your cPanel account, you can navigate and manage files using the Local and Remote directories.
Local Directory (Your Computer)
- Located on the left-hand panel in FileZilla.
- Navigate through folders by double-clicking to open directories.
- Select files or folders to upload to your server.
- Right-click files to Upload, Rename, Delete, or View/Edit.
Remote Directory (Server)
- Located in the right-hand panel.
- Double-click each directory to navigate server folders.
- Download files by right-clicking and selecting Download.
- Right click to Rename, Delete, Create Folder, or View/Edit.
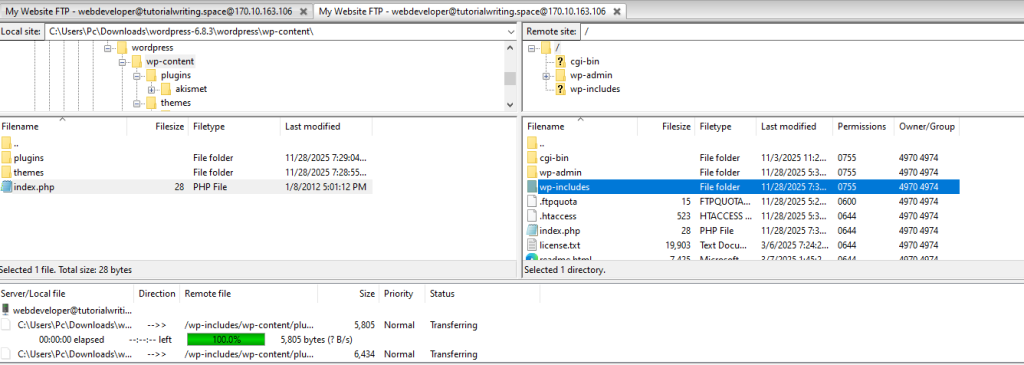
File Transfer
- Drag and drop files between Local and Remote panels to upload/download.
- The queue at the bottom shows ongoing, failed, or completed transfers.
- Double-click queued files to retry transfers when necessary.
Tip: Always check which panel you’re working in so you do not overwrite files.
In this tutorial, you have learned how to connect your website to FileZilla using FTP and SFTP. You will be able to manage website files securely, set up FTP accounts, enable encryption, generate SSH keys, and navigate Local and Remote directories. This gives full control over file transfers, making the process organized, reliable, and safe.